Category Archives: Christmas

A Christmas Cleanup Crisis

Nick and I finally got around to dealing with the post-Christmas chaos this weekend. We took down the tree, found forever homes for all of our gifts, and cleaned up Wrapocalypse 2011 (my nickname for what became of the guest room by the time every gift was tied up with care). Unfortunately, it wasn’t all rainbows and Christmas Miracles.

See that dark stain on the floor where the Christmas tree used to be?

Even though we had put a towel down under the tree stand, apparently enough water escaped during our clumsy watering attempts to soak through and damage the floor. This was one of those moments where your heart sinks down to your feet and you wonder why anyone ever allowed you to be a homeowner.

We haven’t even done anything about it yet, except try to avoid looking at it. I’ve done a bit of googling in  between bouts of self-pity and have some ideas, though. My goal is to avoid having to sand and re-finish that area, which is what most of the internet seems to preach as the best overall solution. One website said to place a towel over it and apply a dry iron, but I think that method is best put to use on less severe damage (water spots that appear white in color, such as from a drink set down without a coaster). The other option I’m considering is to apply a towel soaked in vinegar. Seems easy enough and carries little risk of making things worse. Many websites suggested the use of bleach or oxalic acid, but I’m really worried about causing more harm than good. Those will be last ditch efforts for me, if necessary. Part of me wants to just throw a little rug over the spot and pretend that it never happened. I know that’s not the mature and homeowner-y thing to do, though, so I’ll be putting on my big girl panties and dealing with it for better or worse. Any ideas or suggestions? Tell me we’re not the only ones this has ever happened to.

In less gut-wrenching news, my beloved alma mater is playing in the college football national championship game tonight! I am so freaking stoked, and Nick is just beside himself. He jumped out of bed this morning to put on his favorite LSU shirt and then reminded me to be sure to wear purple and gold to work today. I kind of feel like major milestones in my life are a good omen for LSU. I showed up my freshman year–LSU won a national championship for the first time since 1958. I finished undergrad and started grad school at LSU–they won another national title that year. And now I get knocked up and what do they do? Go and have a perfect season. Coincidence? I think not. I’m mostly kidding, of course. I know that the credit goes to the coaches and players, but no one can deny that college football is a big part of life here in Baton Rouge. Some of the swankier private schools are closed today because so many of their students will be attending the game. And I don’t even want to think about what Nick’s mood will be like for the next several days if things don’t go as we hope tonight. He actually lost sleep the other night because a highly recruited local high-school senior announced that he would be attending Alabama instead of LSU. We feel pretty confident about tonight’s game, though, especially since we’ve already beaten Alabama once this year. Anyway, I’m rambling. I hope you all had a restful weekend, that your Monday is cheerful, and that your floors are in pristine condition. Geaux Tigers!

DIY Snow Jar

My sister always asks me for a gift card for Christmas, and I always oblige her. Our parents refuse to give cash or gift cards, which is what she always says that she wants, so I figure why not give her something she’ll appreciate, even if it is a bit impersonal. She bought her first house this year and requested a gift card to Lowe’s to help her spruce it up. I thought it’d be fun, though, to do something a little more interesting than the whole gift-card-in-envelope thing. So I put my own spin on an idea I saw on Pinterest (originally posted about on The Creative Mama, which appears to be down at the moment but will hopefully be back up and running soon). Shannon was so confused when she saw the heavy box labeled to her from me. Even after she opened it I think it took her a minute to realize that the gift card was inside.

Pretty cool, eh? I started by scavenging an old pickle jar from my stash and scrubbing it clean. I discovered that a little olive oil and a wire mesh sponge could get that pesky label off in no time. Then I soaked the jar and lid in a mixture of warm soapy water, vinegar, and lemon juice overnight to neutralize the pickle stench. Once it was all clean and (mostly) deodorized, I got down to the business of making that lid a little more festive with some red spray paint.

Once the lid was dry I gathered some smallish ornaments from my tree and locked myself and my supplies in the guest room so that no cats could interfere with the creation of my Christmas magic.

The jar that inspired me had some ornaments glued to the lid and others left to float freely, but I was in the mood to get fancy and use some fishing line I already had to suspend them at different heights in the water. First step: tie some line to each ornament.

Then I very nervously glued down the end of the line holding the bronze ornament and waited for it to dry before testing the length.

It was way too long and the ornament rested on the bottom of the jar, so I just glued down more of the string a little bit at a time until it was about the length I wanted.

Then I attached the gift card to the center of the lid with a generous strip of hot glue on either side.

See how cool it looks so far?

I continued with attaching the red ornament, using the same trial and error system to gradually raise it to the perfect height by gluing down the wire just a little bit at a time.

And the little baby ornament comes last. By this time it was old hat and I could guess pretty easily how low I wanted it to hang.

Ta-da! Sorry they’re looking a little wonky in the photo. They kept swinging all around, making photography difficult.

Next, I covered the bottom of the jar with kind of a lot of glitter. Perhaps more glitter than was necessary, but there are only so many times a year that I get to use glitter and I wanted to make the most of it.


Then I filled it with water, leaving a bit of room at the lip to account for the water that would be displaced by my ornaments.

The moment of truth: I screwed the lid on tight and turned the whole thing upside down. Oooooooh, pretty.

Unfortunately, I got a little too excited about turning it over and back repeatedly to watch the glitter swirl around, and this happened…

Womp, womp, womp. One of my ornaments broke, filled with water, and sank to the bottom. I was crestfallen for a moment before remembering this bit of advice from Ryan Gosling:

So I told myself that the broken ornament was symbolic of the imperfection of the holiday season and let it go. I don’t think Shannon even noticed until I pointed it out to her. I, personally, would hate to receive something like this as a gift, because what the heck do you do with it? It’s the kind of thing you really don’t have much use for but feel guilty throwing away. Apparently I don’t mind burdening my family with it, though. It’s the Christmas spirit.

My New Favorite Thing

Proof that my mother listens to me.

I’ve been blogging about wanting these towels for months. I couldn’t justify $18 of my own meager home decor budget on a hand towel towel (especially since I’ve been working hard to save up for some bigger stuff, like new furniture, a rug, and a TV for the new office/family room), but apparently my mom was reading and decided to give them to me for Christmas. They’re every bit as perfect in this bathroom as I’d imagined. That shade of yellow is a perfect match to the trim on the shower curtain. And I love how when I slide them right up next to each other folded in half lengthwise the pattern mirrors itself. Also, for the first time since we first laid eyes on this house I don’t hate that vessel sink. I guess the yellow complements the blue tint to the glass and the classic pattern balances the ultra-modern bowl and faucet. Whatever the reason, I’m thrilled. Thanks, mom!

Merry Monday

Hello hello, I hope you all had a very Merry Christmas! I’m off of work today and inclined to keep this morning’s post short and sweet so I can get back to snuggling under my new heated throw while reading The Hunger Games on my new Kindle (I got completely spoiled yesterday). Juliet, predictably, thinks this is a splendid idea, especially after all the excitement of this weekend. That girl is ready for a week long nap, I think. Check out her Christmas outfit. (sorry for the blurry iPhone pic)
Is she not the cutest, sweetest thing you’ve ever seen? The hat didn’t last long but that jingle bell collar stayed on all day. I was so sad to take it off of her last night! My mother in law, who went to Catholic school, says that I can technically keep it on her until the Epiphany on January 6, but I don’t know if Juliet can handle that much more jingling in her life.

Remember how on Friday I was singing Nick’s praises for picking out my gifts all by himself for the first time ever? We had set a $50 limit on each other and he got me two very sweet and thoughtful gifts: an otterbox case for my phone, which I so appreciate because my old case was almost three years old and quite literally falling apart, and this little garden gnome, to go along with this one that we already had. Now they can be boyfriend and girlfriend!

I wish that Nick and I could both take a whole week off to just hang out and relax around the house, but alas, Nick is back at work today and I will be tomorrow. I plan to spend today savoring my last day of vacation with a rare indulgence of complete laziness. I think it will be glorious.

Wrapping Week: Lagniappe

I spent yesterday morning getting the last of my presents wrapped before heading out of town and, as promised, I’m here to share. This one’s for my Aunt Barbara, who I got in this year’s family Christmas drawing. I followed my dream of cutting out her first initial to plop in the center of a paper doily, but the edges were looking a little rough (especially the insides, since I had to cut those with an exacto knife). Solution? Disguise the ugliness with glitter!

This one’s for my mom. Another cylindrical gift wrapped in fabric, but this time I added a little flair with a bright pink ribbon threaded through a paper doily (I just measured and cut two slits with an exacto knife), then a little medallion of hot glue + glitter in the center.

For my Grandma, who is one classy lady: white paper, a band of burlap, and a fabric flower.

This one’s for Nicholas (from my PawPaw, who outsourced his shopping this year). I was determined to use that pretty paper somewhere, even though Nick is unlikely to give it the appreciation it deserves. I cut a large circle and trimmed the edges with scalloped scissors, then layered a paper doily and a wax paper flower on top. Very manly looking.

And here they all are under my tree, right before Nick and I packed them all up to head out of town (our parents both live 1-1.5 hours away and we spend holiday weekends shuffling back and forth between the two). Ten bonus points if you can spot Pistachio living amongst the presents.

Of course there were a few last minute things that I’m going to have to wrap at my mom’s house using regular ol’ normal people wrapping paper, and that’s okay. I’m just so ready to be done with all the hustle and bustle so I can just relax and enjoy the holiday! I said it yesterday, and I’ll say it again, thank you so much for reading and I hope you have an awesome, amazing, absolutely spectacular holiday weekend! I’ll be back on Monday to talk about some of the gifts I gave (there’s at least one DIY in there). Merry Christmas!

Wrapping Week: Fabric and Yarn

My favorite part of this year’s wrapping strategy is getting to finally use up some of my fabric and yarn stash. I didn’t have enough left of this linen to really do much with, but it was perfect for wrapping around a cylindrical gift (tied with string at each end, with a small piece of double-sided tape used to hold things together at the seam).

I’ve got a whole skein of this yellow yarn (a perfect match for LSU gold, might I add), but I can’t even tell you the last time I knit or crocheted something. My attention span is getting shorter in old age and those types of projects just take too dang long. So I used some of that lovely yarn to create an off-center band of color around this simple brown box. A few dabs of hot glue at each end and periodically throughout keep it secure.

Now for the part where I make fun of my husband’s sweet efforts. His use of yarn is a little more minimalist.

Hahahahaha oh that man really struggles with gift wrap, but he’s trying so hard this year. Those end pieces are just so tricky, even on a plain ol’ rectangle of a box. Here’s another one from him. I suggested the linen bow when he was complaining that it looked so sad.

There was a time in our relationship when I was lucky to get a gift wadded up in a plastic grocery bag, so I’m not complaining. I think it’s sweet that he’s really trying. He even asked me for lessons. And he picked out everything on his own this year! I have no idea what he’s giving me. A few years ago he actually gave me money to just go and get my gift myself. This is the first time ever that I’ll be surprised, and I’m sure whatever is inside those lovely little packages will thrill me to no end.

I’ve still got some more packages to tie up with string (or yarn, fabric, or doilies),  so if you’re still looking for inspiration come tomorrow check back here for pics of my final few. Otherwise, have a very merry Christmas (or a great weekend, if the holiday isn’t your thing)!

Wrapping Week: Paper Doilies

I got a pack of 20 paper doilies for a mere $2 in the baking aisle at Hobby Lobby last week. I hear you can also snag them at the grocery store, but Nick does the food shopping in our family and I know from experience that it’s a recipe for disaster to ask him to hunt down something exotic and outside of his usual grocery repertoire. I’ll get a bunch of panicked and stressed phone calls telling me he can’t find it and I’ll wish I’d just gone and gotten it myself (in secret, of course, because he tries to keep me out of the grocery store at all costs. He says I make too many impulse buys, pshh). That man is just something, I tell ya. I should put a doily on one of his gifts to teach him a lesson. Ironically, the box below is for my dad. Not very masculine-looking in retrospect. Sorry, Dad.

Exhibit A: a plain ol’ box wrapped in brown paper

Exhibit B: the same box, made infinitely more delightful by the addition of a paper doily and a bit of string.

Is that not the cutest thing you’ve ever seen? A brown paper package tied up with string…and a doily! Makes me wanna sing about my favorite things. I affixed the doily with just a dab or two of hot glue in the center and then the string holds down the edges.

I also slapped a doily on this plain brown lunch bag. I already showed it off the other day for its burlap bow, but it’s so awesome it’s making a repeat appearance. Notice how I trimmed the top edge with scalloped scissors, too? So easy and fun.

I stuck this one on there with spray adhesive and folded the edges back around the sides of the bag. You know what I think would be the cutest, though? To cut the recipient’s first initial out of scrapbook paper or colored cardstock and stick it in the center of the doily. I’ve got a few more gifts left to wrap and I’m hoping to put that particular stroke of genius to use on one of them.

Wrapping Week: Glitter Tape

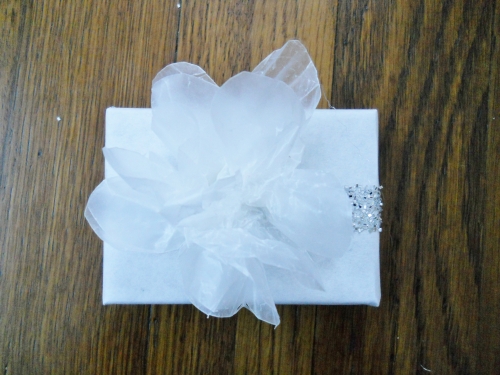
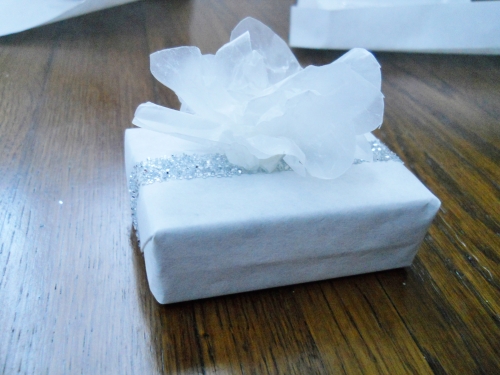
Here’s Genius Idea #2. Glitter Tape. I’ve only executed it on one wrapped gift so far, but I’ve still got a few more to go and I’m hoping it’ll make another appearance. I wrapped this small box in white project paper. I left the flaps to be attached by the glitter tape, although I probably could have gone ahead and pinned them down with a dab of glue before proceeding. Either way.

Then I wrapped a piece of double-sided tape up over the loose side flap, across the top, and down the other side.

Peeled off the paper backing and got my glitter on. I tapped and shook and brushed off the excess pretty aggressively to prevent glitter apocalypse in my present pile.

Then, I topped it off with a wax paper pouf (adhered with a dab of hot glue) and called it a day.

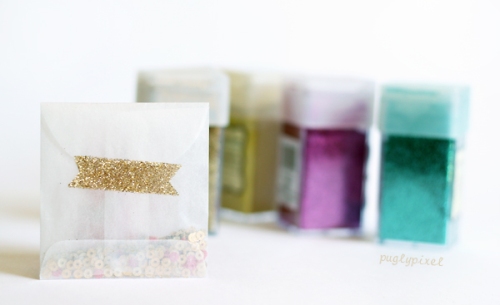
Festive, isn’t it? I think this technique is best pressed into service on smaller packages, where the proportion of tape to box mimics ribbon. It would likely just be dwarfed on larger packages unless you placed several strips side by side, and, let’s face it, that’s probably not an economical use of double-sided tape. Best to stick to the small boxes where you get more bang for your buck. Just now I got the idea that if your recipient had a rather straight-lined first initial, you could even do their monogram in glitter. L, T, M, or N would all be good candidates, I think. Or if you’re really creative you could use the tape to outline the silhouette of, say, a Christmas tree, or a very simple snowflake, then douse in glitter and step back to admire your genius. But the more I think about it, I think it’s best to keep it simple. Maybe use a small strip of tape to pretty-up a very simple box, or even an envelope. Like this:

puglypixel.com

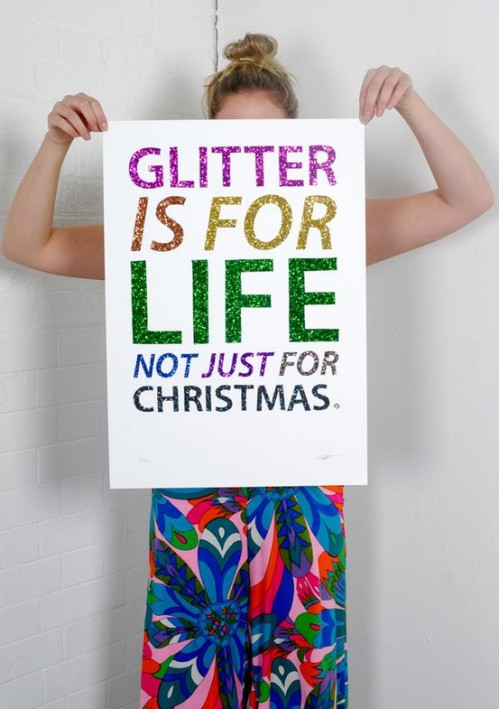
Adorbs, right? I love how she trimmed the edges. So much cuteness for something so small. I hope this post inspired you to bring a little glitter into your gift-wrap this year, and I will leave you with this parting image (via Pinterest).

Pinterest

Wrapping Week: Burlap Bows

‘Twas the week before Christmas and all through the house, were stashed hidden presents for family, friends, and spouse. They needed to be wrapped up and embellished with care, in hopes that the receiver would appreciate their flair.

Did you like my poem? I worked on it for a long time. I shoulda been a poet. But alas, I’m just a plain ‘ol social worker with an English undergrad I use only for blogging. This poetry crafting, blog writing, social working girl has quite a bit of gift wrapping to get done between now and December 25th. Did you think I would miss the opportunity to stretch it out into as many blog posts as possible spare you the details? Oh no, my friends. You are in for a week’s worth of wrapping goodness, starting with my proudest accomplishment of the weekend: the burlap bow.

You may remember that I like to wrap my gifts in brown craft paper, and that in the past I’ve spent a pretty penny on ribbon to gussy it up. This year I decided to get creative and avoid the highway robbery that is the ribbon aisle at Hobby Lobby and opt instead for less traditional embellishments. I vowed to look around my house and use stuff I already had on hand, then gave myself a $15 budget for paper and other embellishments. $10 of that went towards paper–$3 on two small rolls of craft paper (at Dollar General) and $7 on a big roll of white “project paper” (at Hobby Lobby). I hadn’t planned on getting the white paper, but I usually buy my brown paper at Hobby Lobby and they were out, so I bought the white stuff as a backup plan in case I couldn’t find craft paper anywhere else. Now I’m embracing the variety it adds to my collection of elegant little packages.

I started the wrapping extravaganza by locking myself in the guest room with every crafty item I own:

The burlap bows were a stroke of genius. I have a bunch of it left over from the burlap table runner I made once upon a time, but even new it will only run you five to seven bucks a yard. I simply cut it roughly into strips and tied it around stuff to add some rustic charm.

Notice the lack of a fancy bow. That’s just a plain ‘ol knot, but burlap makes it look special.

In the photo above I cut a long strip in half and tied the two pieces together (instead of wrapping the whole long thing around the box), then stuck it on top of the box with a dab of hot glue.

This paper lunch bag had a lot of cool things done to it, but the part with the burlap was accomplished by punching a big hole through the flap, then wrapping a strip of burlap around the back, under the flap, and carefully out through the hole, then tying a knot. The knot is bigger than the hole so it keeps the bag closed.

Some tips:

  • Burlap is messy. Prepare yourself accordingly.
  • Tape does not stick well to craft paper. This is the first year I’ve stopped fighting the tape and turned to hot glue instead, and I’ll never look back.
  • Go forth with reckless abandon and get ready for everyone you know to ooh and ahh over how creative you are.

I’ll be here all week, showing you my tips and tricks for wrapping presents with non-traditional supplies. Get excited!

Tree Skirt First Aid

Remember how Pistachio thinks the Christmas tree belongs to her?

Well, that arrangement isn’t really working out too well for the tree skirt, which has taken quite a beating. Two of the three ribbons that hold the edges together have become detached, and I often find the skirt in a tangled mess, barely hanging on to the base of the tree. Not very festive.

So, I decided to ditch the ribbon and try something a little more heavy-duty to hold it together. I had some self-adhesive velcro in my sewing stash, and I knew from experience that it’s ultra-stickiness is nothing to be sneezed at.

I lined up the edges of the skirt (or skoite, as Nick’s mom likes to call it) and folded them in towards each other.

Then I removed the adhesive backing and pressed a piece of Velcro onto each side.

I repeated the process with all four pieces of velcro, spaced periodically between the edge and the center.

Here’s how it looks from the top. The look isn’t exactly seamless, but this part will hopefully stay at the back of the tree.

Ta-da. The skirt is back in it’s rightful place.

The velcro lasted a whole three days, which is a long time when you’ve got a crazy cat trying who considers it her personal plaything. The skirt is back to its sad state now though so I need another strategy. I’m thinking maybe velcro that’s sewn on? Get rid of the cat? Give up on the tree skirt entirely?